
Overview
pfSense is installed, Kali is on the LAN, and you’ve already confirmed you can reach https://10.10.10.1. Time to actually configure the thing. Right now your firewall is running on defaults – which means your optional interfaces are sitting there doing nothing, your admin password is still pfsense, and your network segments aren’t actually segmented in any meaningful way.
This tutorial fixes all of that. By the end, you’ll have a properly configured firewall with named interfaces, DHCP on every segment, isolation rules that actually isolate things, and a configuration backup so you’re not starting from scratch if something breaks. This is where your lab stops being a collection of VMs and starts being an actual segmented network.
What You’ll Learn:
- Changing the default admin password
- Setting hostname, DNS, and timezone manually
- Optional interface setup (DMZ1, DMZ2, CORP, SPAN)
- DHCP configuration per segment
- Firewall rule creation and rule order logic
- Firewall aliases for easier rule management
- Logging setup
- Configuration backup
Estimated Time: 45-60 minutes
Difficulty Level: Intermediate
Prerequisites
Before You Begin:
- Tutorial 2 complete – pfSense installed and running with LAN at 10.10.10.1/24
- Tutorial 3 complete – Kali Linux installed and able to reach
https://10.10.10.1 - pfSense login screen open in Firefox on Kali
💻 Hardware check: Not sure if your machine is ready for this stage? See Hardware Check for full specs and what you can run at each point in the series.
Part 1: Logging In and Initial Configuration
pfSense CE 2.8.1 does not launch a setup wizard on first login – you land directly on the Dashboard. Initial configuration (password, hostname, DNS, timezone) is all done manually through the menus. This part walks you through each one.
Step 1: Log In

- Open Firefox on Kali and navigate to https://10.10.10.1. Accept the certificate warning if prompted.
- Log in with the default credentials:
- Username:
admin - Password:
pfsense
- Username:
💡 Yes, these are embarrassingly public credentials. We’re changing them in the next step. Just get in the door first.
Step 2: Change the Default Password
The first thing you’ll see after logging in is the Dashboard with a red warning banner at the top:
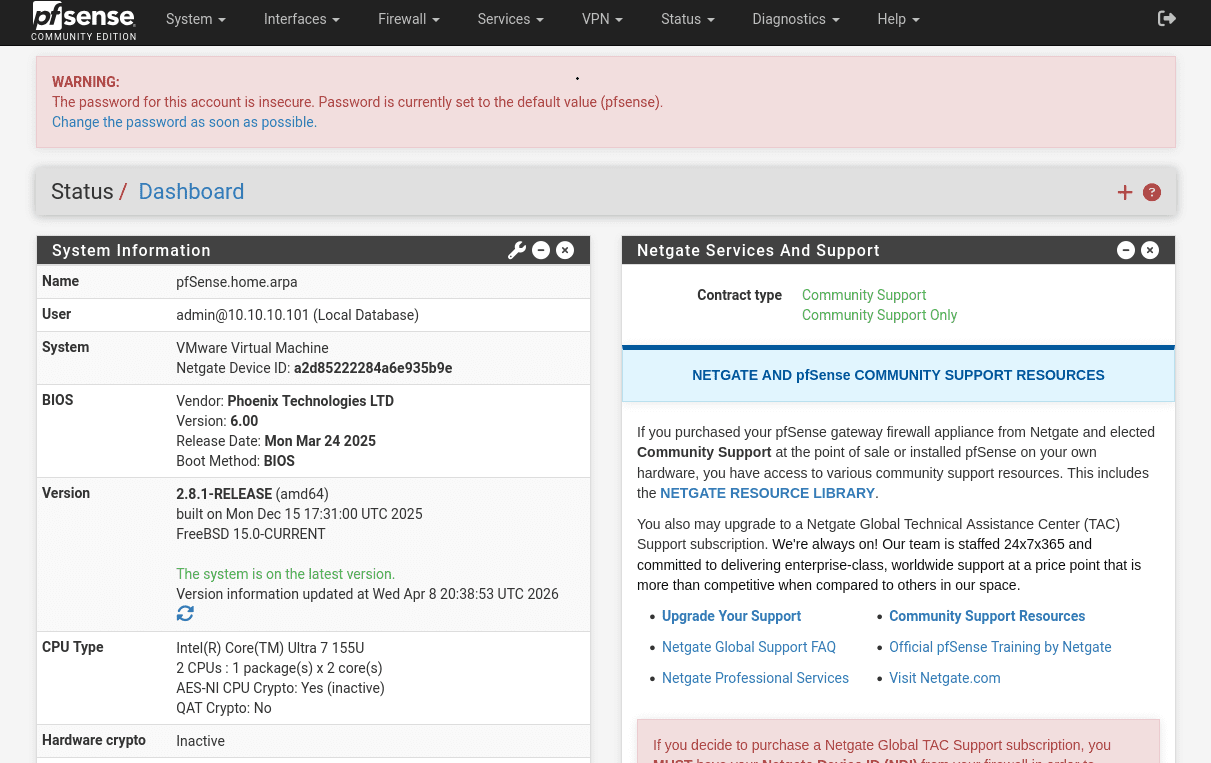
- Click the link inside that banner. It takes you directly to the password change page.
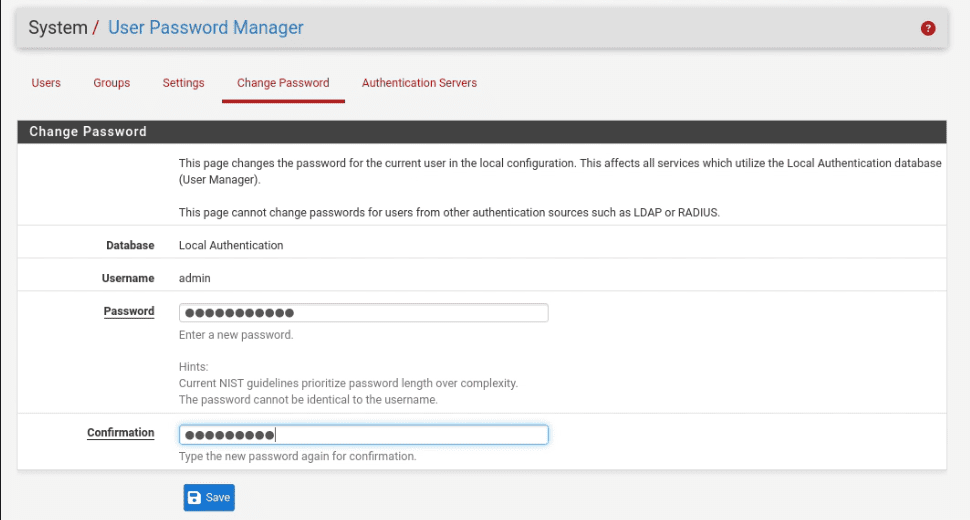
- Enter a strong password, confirm it, and click Save.
💡 Store this in a password manager right now. Bitwarden is free, KeePass works offline, 1Password if you’re fancy. Whatever you decide to use, save it before you close this screen. I imagine the number of people who complete this step and then spend twenty minutes googling “pfSense default password reset” is higher than anyone would like to admit.
pfSense will log you out and return you to the login screen. Log back in with your new password.
Step 3: Set Hostname and Domain
Go to System > General Setup.
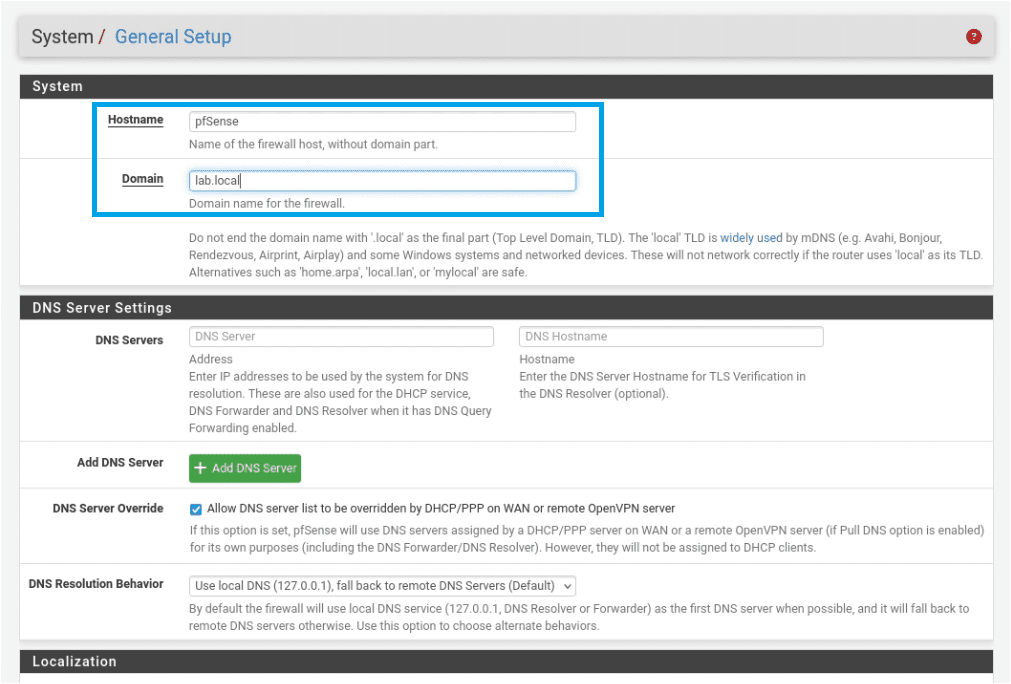
- Hostname:
pfsense(or whatever you want to call it –lab-firewallworks too) - Domain:
lab.local
💡 lab.local is a common domain name for home labs – you’ll see it referenced quite a bit. Using it here keeps things consistent with documentation and tutorials you’ll run into later.
Leave everything else on this page at its defaults for now. Scroll down and click Save.
Step 4: Configure DNS Servers
Still on System > General Setup, scroll to the DNS Server Settings section.
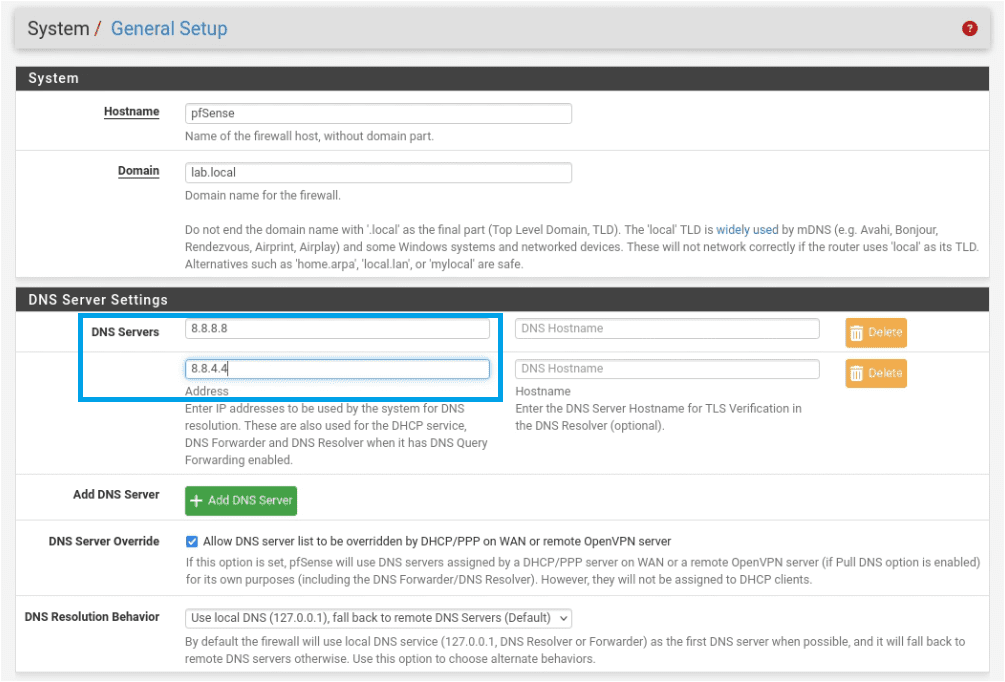
- DNS Server 1:
8.8.8.8 - DNS Server 2:
8.8.4.4 - DNS Server Override: Leave unchecked
Click Save.
Step 5: Set Your Timezone
Still on System > General Setup, scroll to the Localization section.
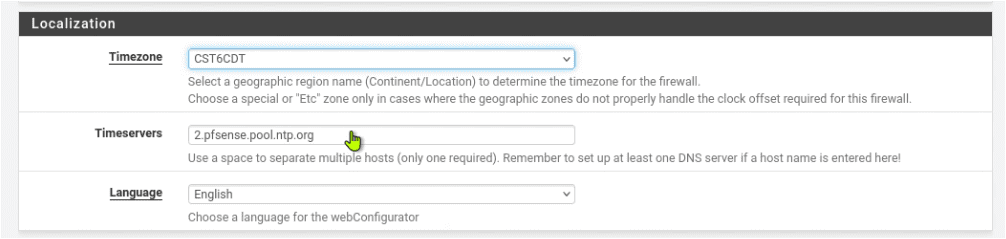
- Timezone: Select your timezone from the dropdown
- Timeservers: Leave as
pool.ntp.org– the default is fine
Click Save.
💡 Accurate time matters more than you’d think. Log correlation, certificate validation, and security event analysis all depend on timestamps being correct. Set your timezone properly now and you won’t have to debug time-related weirdness later.
Step 6: Verify WAN Settings
Click the Interfaces menu tab at the top of the page and select WAN.
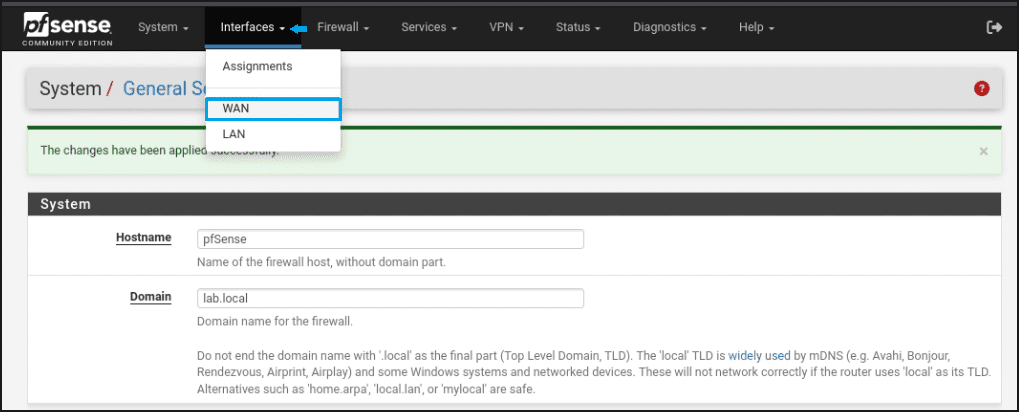
Scroll down to Reserved Network(s) located at the bottom of the page.
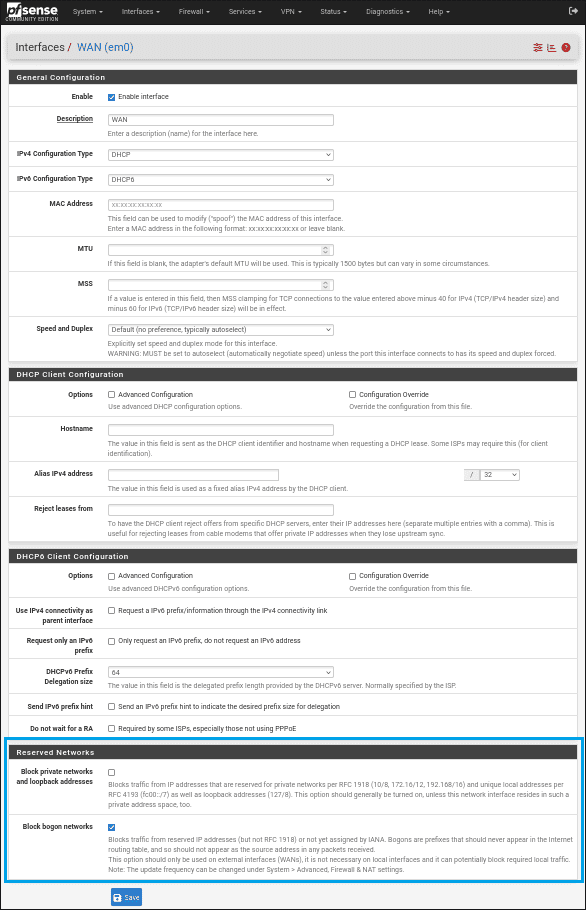
Confirm the following settings in Reserved Network(s):
- Block RFC1918 Private Networks: Leave unchecked — your home network is a private address range (192.168.x.x or similar), and blocking RFC1918 here would break your internet access entirely
- Block bogon networks: Leave checked — this blocks invalid and reserved IP ranges from reaching your WAN, which is always a good idea
If you make any changes, click Save then Apply Changes. If everything already looks correct, no action needed.
💡 Quick note on Block RFC1918 for anyone about to spiral: This setting exists for real-world firewalls where private IP addresses arriving on the WAN are almost certainly spoofed or malicious. In a home lab where your WAN connects to your home router (which uses private addresses), enabling this breaks everything. Leave it unchecked. This isn’t a security compromise — it’s context-appropriate configuration.
Part 2: A Quick Look Around the Dashboard
Before diving into interface configuration, take a minute to familiarize yourself with the dashboard. It’s basically a home base that you’ll return to often, so it’s worth knowing what’s on it.
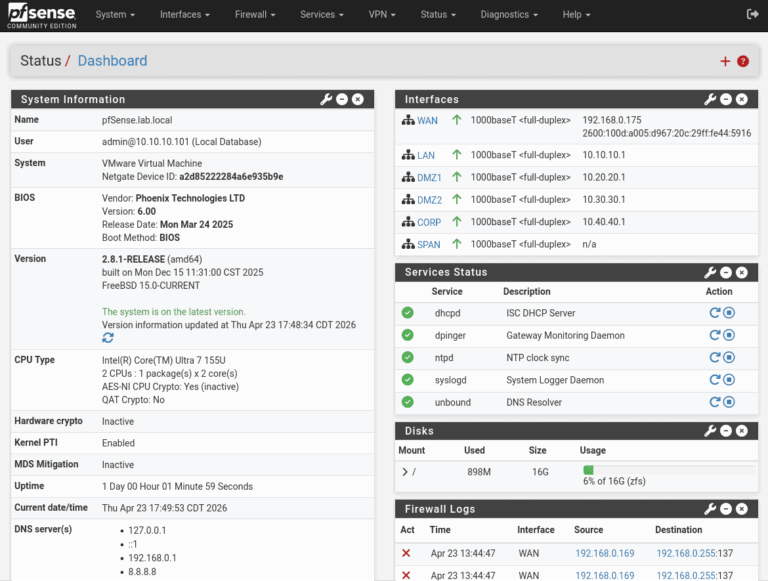
The panels you’ll be coming back to regularly:
- System Information: version, uptime, CPU and memory usage
- Interfaces: WAN and LAN status with current IPs
- Firewall Logs: recent traffic and blocked connections
- Services: what’s running and what isn’t
You can also customize the dashboard. Here’s how:
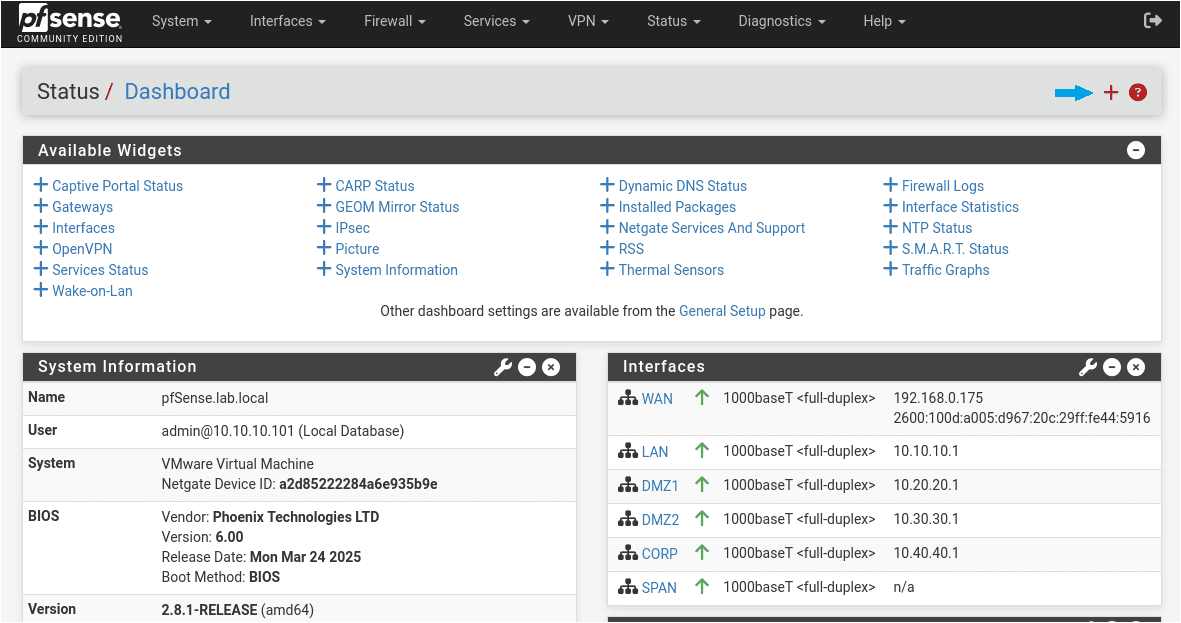
- Add panels: Click the ‘+’ near the top-right of the page to display the widget menu options
- Remove panels: Click the ‘x’ at the top-right corner of the panel window
- Re-arrange panels: Click the panel you want to move and drag/drop to the preferred position on the dashboard
The navigation bar at the top of the page is where everything lives. The menus you’ll use most in this tutorial are Interfaces, Services, Firewall, and Diagnostics.
💡 Optional performance tweak: If your host machine is on the lighter side, go to System > Advanced > Miscellaneous and check “Do not display traffic graphs.” Traffic graphs look nice but consume CPU continuously. You can always re-enable them when you specifically want to watch traffic patterns.
Part 3: Configuring the Optional Interfaces
Remember those four other network adapters you added in Tutorial 2? Right now pfSense knows they exist but doesn’t yet know what they are or what to do with them. That changes now.
Step 1: Interface Assignments
Go to Interfaces > Interface Assignments. You’ll see WAN and LAN interfaces have already been assigned, and Available network ports with em2 listed.
- Click +Add to assign interface OPT1 to port em2.
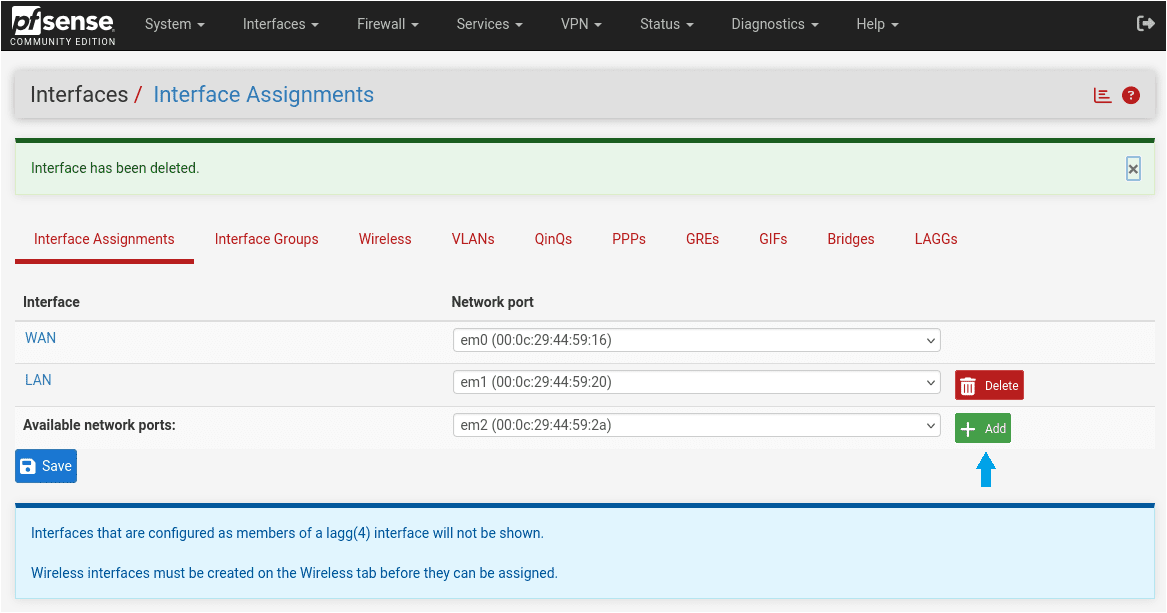
- Continue clicking +Add to assign interfaces OPT2 through OPT4 to network ports em3 through em5.
- Click Save.
Step 2: Configure Each Interface
Now that all interfaces have been assigned, next up is configuring each OPT interface. The process will be the same for all four: click the interface, enable it, give it a name and IP address, save, apply.
- Click on OPT1 to open its configuration.
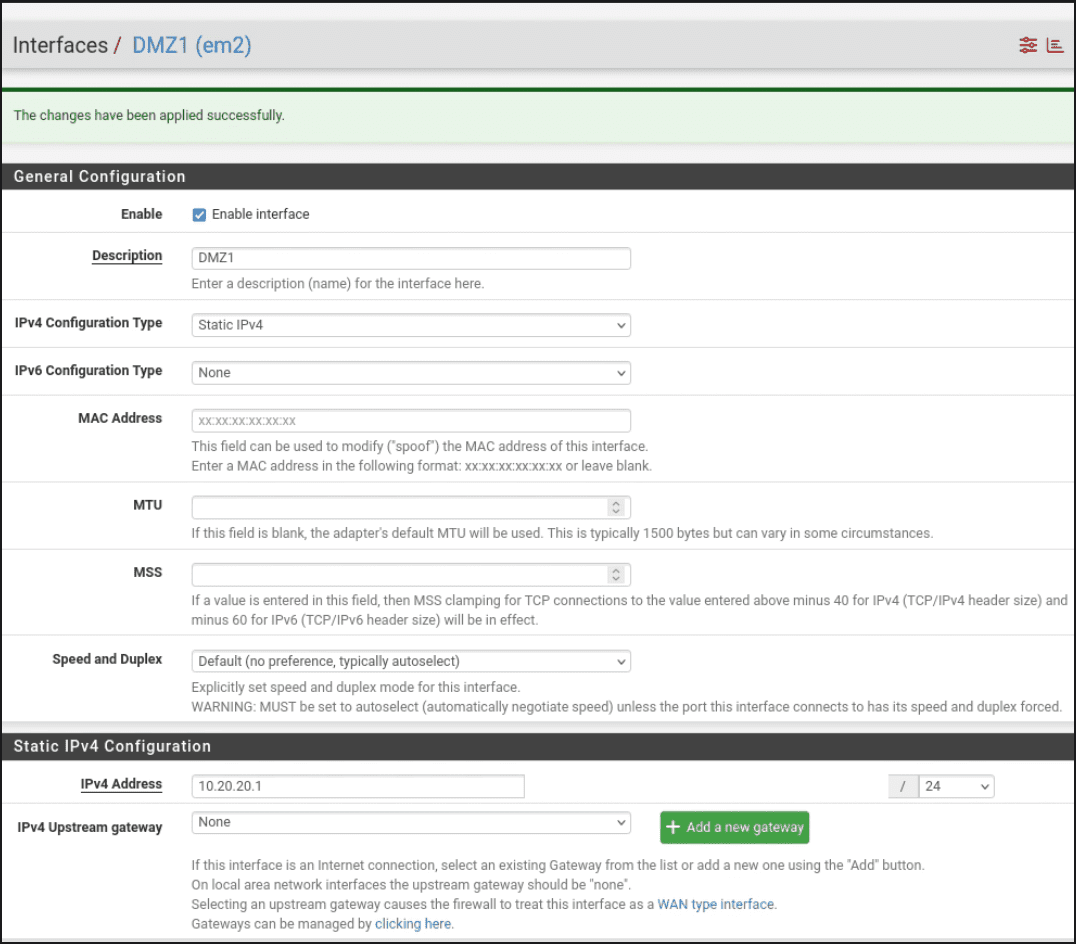
- Enable interface: 🗸 Check this
- Description:
DMZ1 - IPv4 Configuration Type: Static IPv4
- IPv4 Address:
10.20.20.1/24
Click Save then Apply Changes.
💡 This interface will house your vulnerable machines: Metasploitable2, VulnHub targets, and anything else intentionally broken that you want to keep isolated from everything else in the lab.
- Click OPT2.
- Enable interface: 🗸 Check this
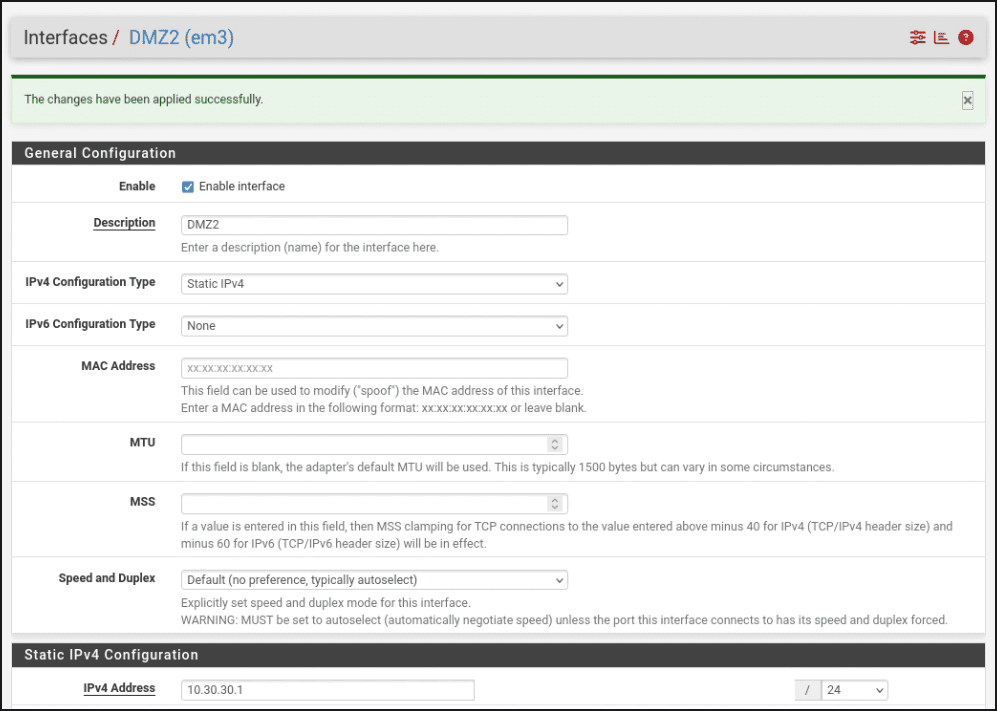
- Description:
DMZ2 - IPv4 Configuration Type: Static IPv4
- IPv4 Address:
10.30.30.1/24
Click Save then Apply Changes.
- Click OPT3.
- Enable interface: 🗸 Check this
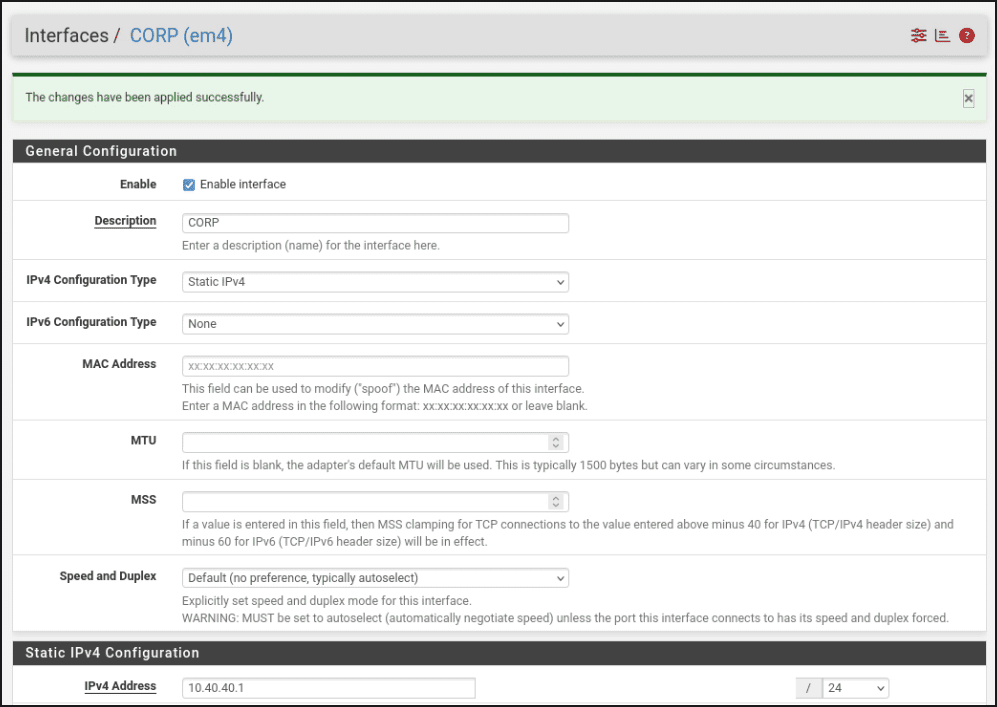
- Description:
CORP - IPv4 Configuration Type: Static IPv4
- IPv4 Address:
10.40.40.1/24
Click Save then Apply Changes.
💡 Planning ahead for Active Directory: In a later tutorial, you’ll be adding the Domain Controller to the CORP segment and it will need a static IP rather than DHCP. We’re reserving 10.40.40.10 for the DC and we’ll actually set up the DC when we get there. Jot down the IP address somewhere so you have it when you need it later – without a doubt, you will need it.
- Click OPT4.
- Enable interface: 🗸 Check this
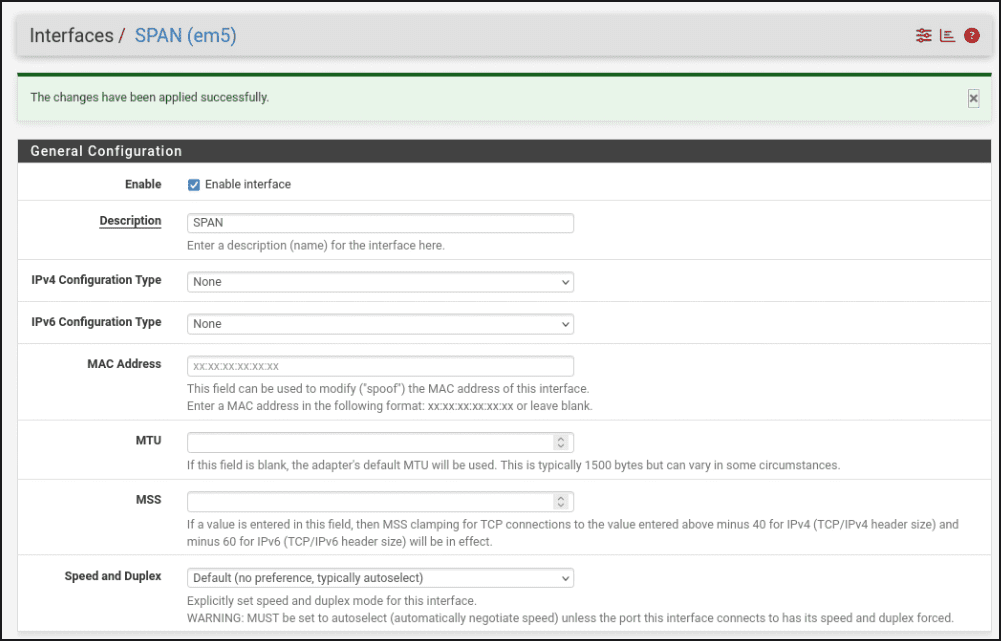
- Description:
SPAN - IPv4 Configuration Type:
NONE(do not assign an IP address to this interface)
Click Save then Apply Changes.
💡 Why no IP on SPAN? This interface is for port mirroring, so it will receive copies of traffic from other segments for Security Onion to analyze. A monitoring interface doesn’t need an IP because it’s not routing traffic, it’s just listening. Assigning an IP here would actually interfere with how it works.
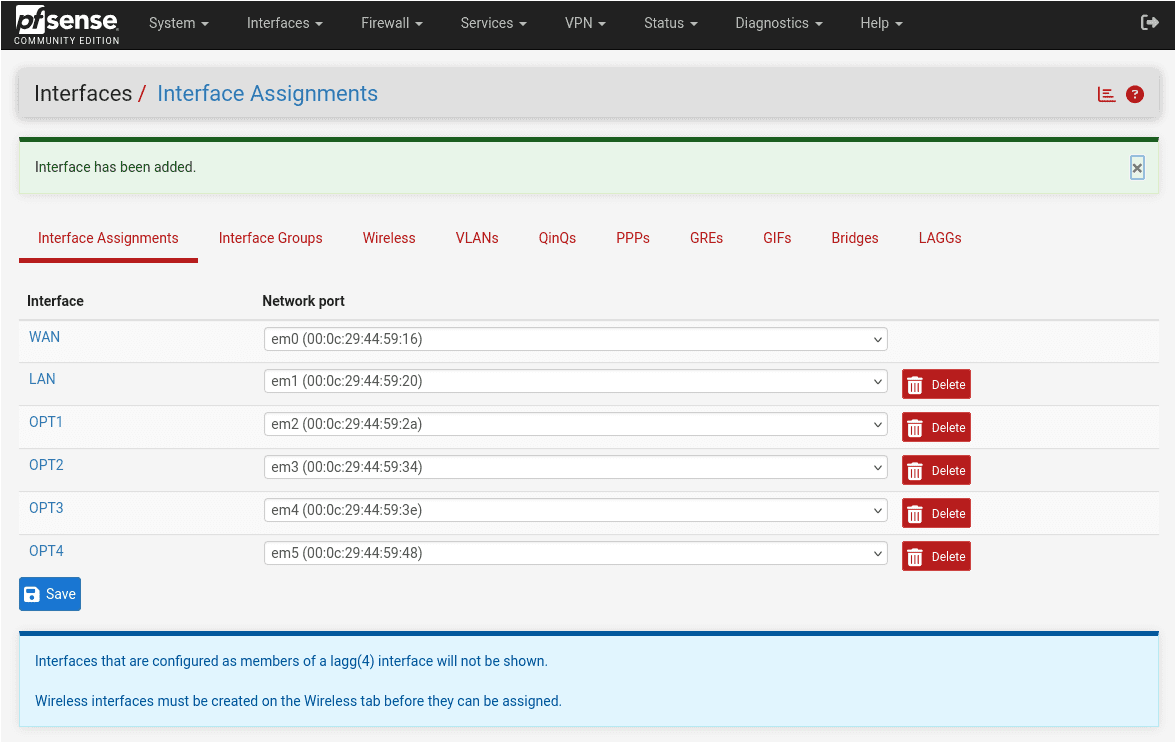
- Go back to Interfaces > Assignments and confirm all six interfaces are showing correctly:
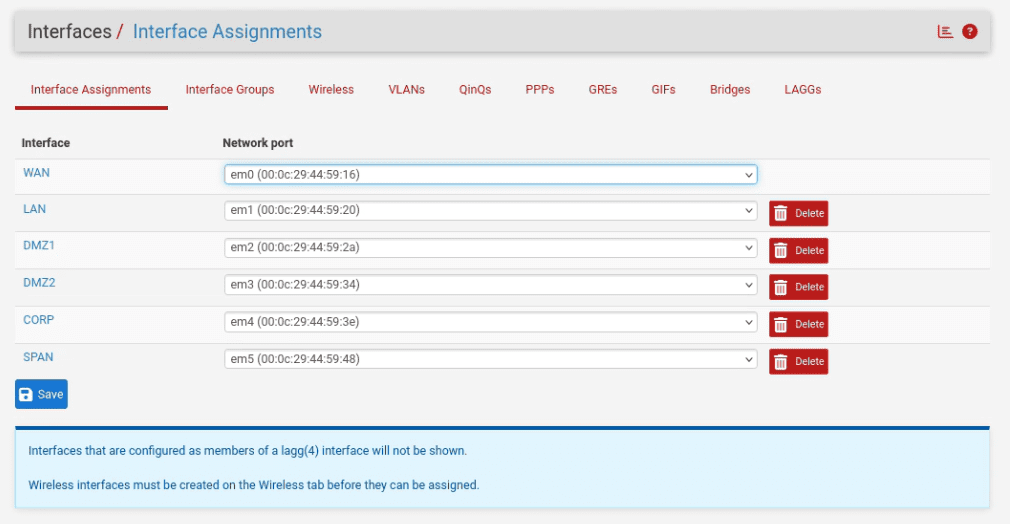
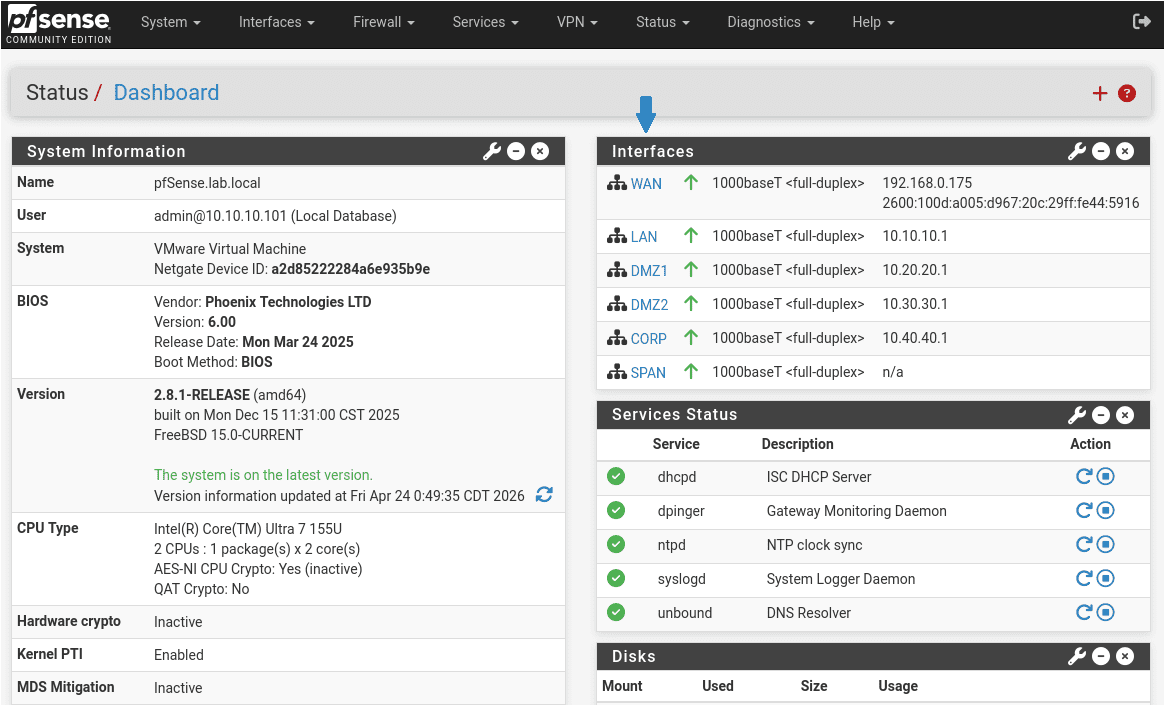
- 🗸 WAN (em0): connected to home network
- 🗸 LAN (em1): 10.10.10.1/24
- 🗸 DMZ1 (em2): 10.20.20.1/24
- 🗸 DMZ2 (em3): 10.30.30.1/24
- 🗸 CORP (em4): 10.40.40.1/24
- 🗸 SPAN (em5): no IP
Part 4: Enabling DHCP on Each Segment
Interfaces are configured, but your VMs won’t get IP addresses until you turn on DHCP for each segment. At the top of the page, go to Services > DHCP Server – you’ll see a tab for each interface you just configured with an IP address.
💡 There is no DHCP tab for SPAN because it has no IP address and isn’t serving addresses to any of your interfaces.
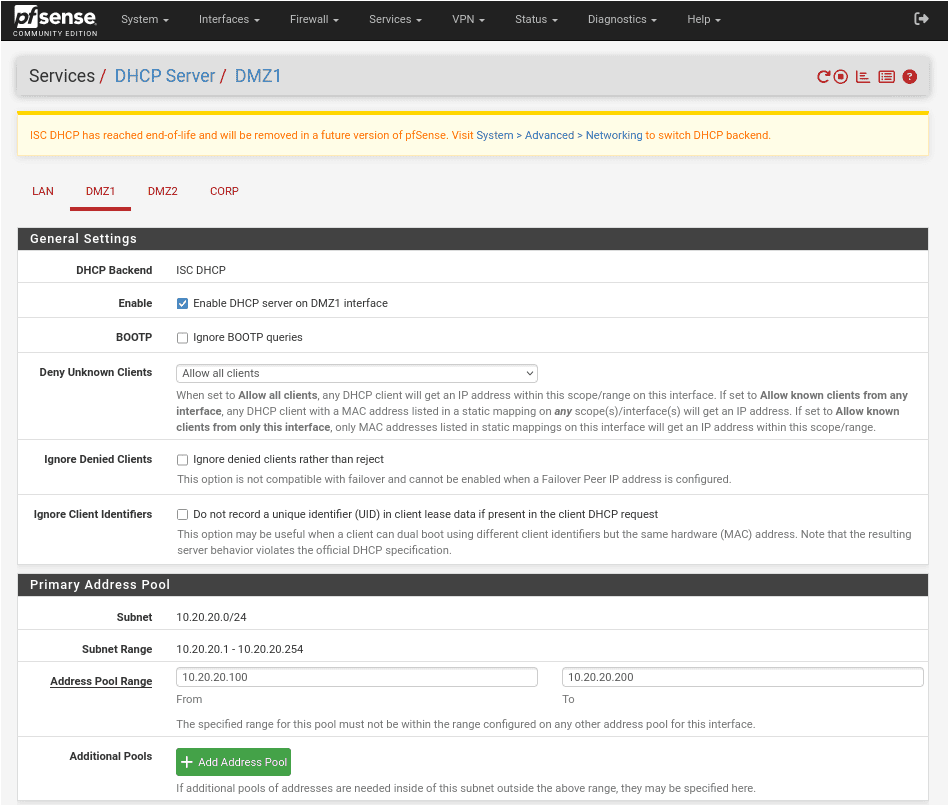
- Enabling DHCP Server for DMZ1:
- On the DHCP Server page, click the DMZ1 tab.
- Enable DHCP server on DMZ1 interface: 🗸 Check this
- Range From:
10.20.20.100 - Range To:
10.20.20.200 - Scroll down and click Save then Apply Changes.
- Enabling DHCP Server for DMZ2:
- On the DHCP Server page, click the DMZ2 tab.
- Enable DHCP server on DMZ2 interface: 🗸 Check this
- Range From:
10.30.30.100 - Range To:
10.30.30.200 - Scroll down and click Save then Apply Changes.
- Enabling DHCP Server for CORP:
- On the DHCP Server page, click the CORP tab.
- Enable DHCP server on CORP interface: 🗸 Check this
- Range From:
10.40.40.100 - Range To:
10.40.40.200 - Scroll down and click Save then Apply Changes.
💡 Each active segment now follows the same address structure:
.1 – pfSense gateway | .1-.99 – static assignments | .100-.200 – DHCP pool | .201-.254 – reserved for future static assignments
Part 5: Firewall Rules
This is where the actual security work happens. Before you start writing any rules, a few pfSense rule and interface behaviors worth understanding:
- WAN: Blocks all inbound traffic by default (except return traffic for established connections)
- LAN: Allows all outbound traffic by default (this is what lets Kali reach pfSense and the internet)
- OPT interfaces (DMZ1, DMZ2, CORP, SPAN): Block everything by default (no rules means no traffic in or out)
Your DMZ and CORP networks are currently isolated – so nothing gets in or out until you explicitly allow it. This is correct behavior and not a problem.
⚠️ Rule order determines what executes – entry sequence determines rule order.
pfSense processes firewall rules top-to-bottom and stops at the first match. If a Block rule sits above an Allow rule, the Block wins and the Allow never executes. Getting the final order right isn’t just important – it’s everything.
pfSense displays rules in the order they were added, so how you enter them controls where they land in the processing queue. The Add ↓ button appends a rule to the bottom of the list. The Add ↑ button inserts a rule at the top, pushing everything else down. By entering the Block rule first with Add ↓, then using Add ↑ for each Allow rule, every new Allow rule lands above the previous one, building the correct final order without any manual dragging. The correct entry sequence for each interface is called out below. Follow it exactly.
Step 1: Create the RFC1918 Alias
The first thing we’re going to do is create an alias. This will let you reference a group of addresses using a single name instead of typing individual IPs in your rules every time. Aliases not only save you time on rule creation but they also keep your rules readable as your lab grows.
Go to Firewall > Aliases and click Add:
- Name:
RFC1918 - Type: Network(s)
- Networks:
10.0.0.0 / 8172.16.0.0 / 12192.168.0.0 / 16
- Description:
All private IPv4 address ranges
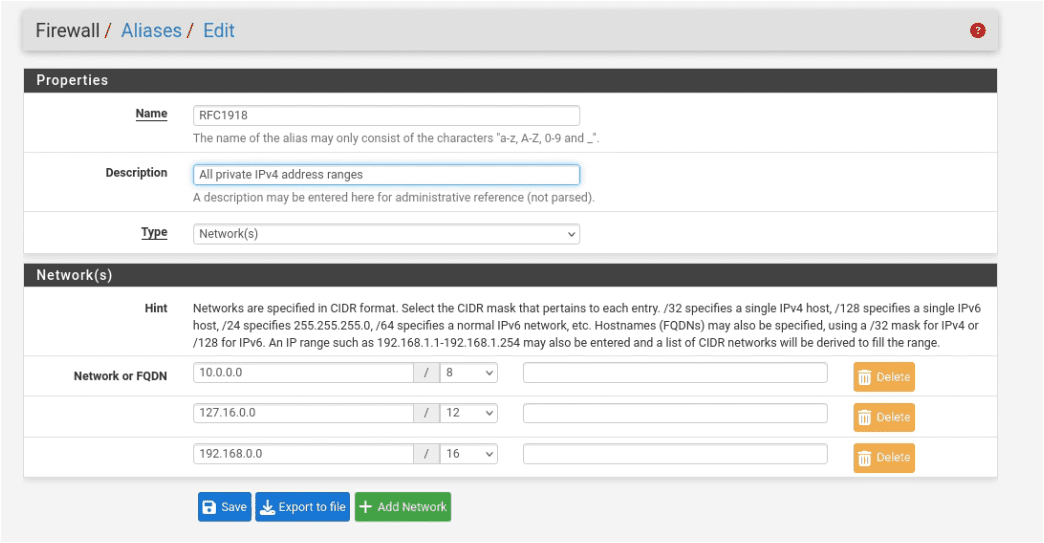
Click Save then Apply Changes.

💡 What is RFC1918? It’s the standard that defines which IP address ranges are reserved for private networks: 10.x.x.x, 172.16-31.x.x, and 192.168.x.x. Every device on your home network, your lab LAN, your CORP segment, and your DMZ segments all live within these ranges. Blocking RFC1918 in your DMZ rules prevents vulnerable machines from reaching any of those networks in a single rule – rather than writing three separate block rules for each range.
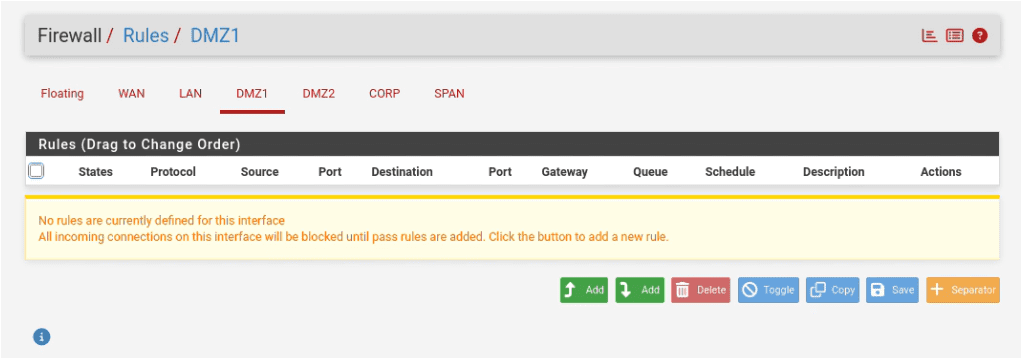
Step 2: DMZ1 Rules
You’ll add three rules for DMZ1. Just a quick reminder that the order you enter rules and the button you use to add them both matter. Be sure to follow the exact sequence as written.
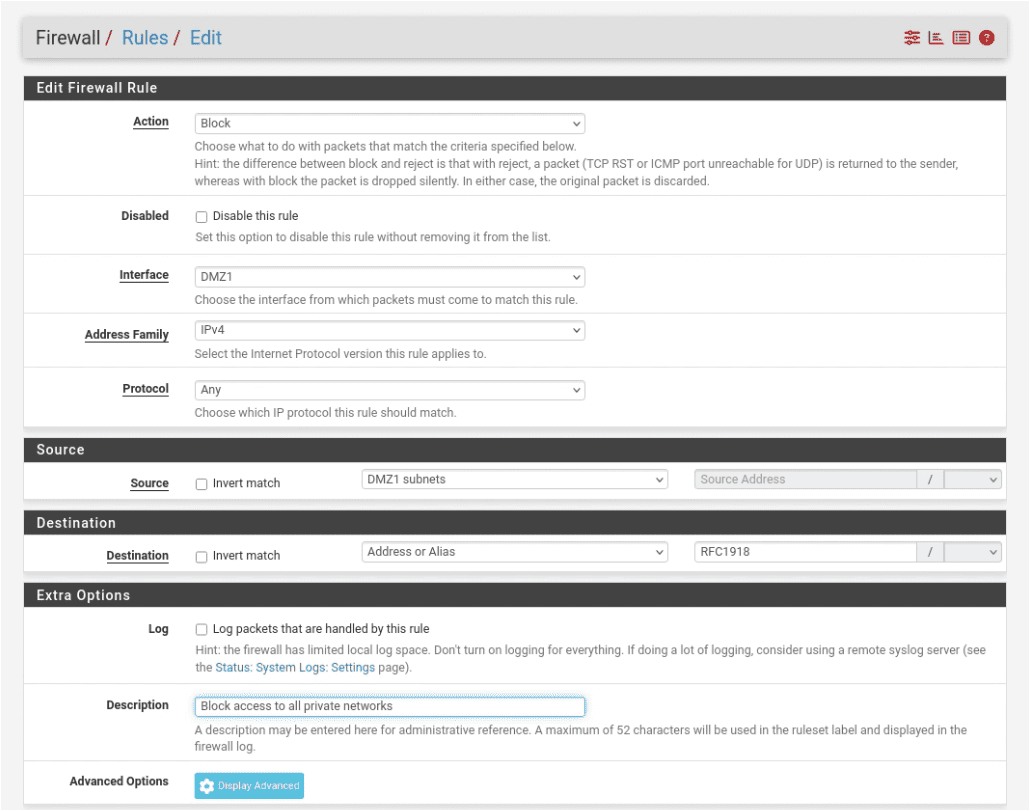
- Click Add ↓ (add to bottom):
- Action: Block
- Protocol: any
- Source: DMZ1 subnets (all traffic from the entire 10.20.20.0/24 subnet)
- Destination: RFC1918 (the alias you just created)
- Description: class=”EnlighterJSRAW” data-enlighter-language=”bash”>Block access to all private networks
- Click Save. Do not click Apply Changes yet.
- Click Add ↑ (add to top):
- Action: Pass
- Protocol: TCP
- Source: DMZ1 subnets
- Destination: any
- Destination Port: HTTP (80), HTTPS (443)
- Description:
Allow web traffic to internet - Click Save. Do not click Apply Changes yet.
- Click Add ↑ (add to top):
- Action: Pass
- Protocol: TCP/UDP
- Source: DMZ1 subnets
- Destination: DMZ1 address: this is pfSense’s own IP on this interface (10.20.20.1) not the whole subnet
- Destination Port: DNS (53)
- Description:
Allow DNS queries to pfSense - Click Save.
- Before clicking Apply Changes, verify your DMZ1 rule list looks exactly like this, from top to bottom:
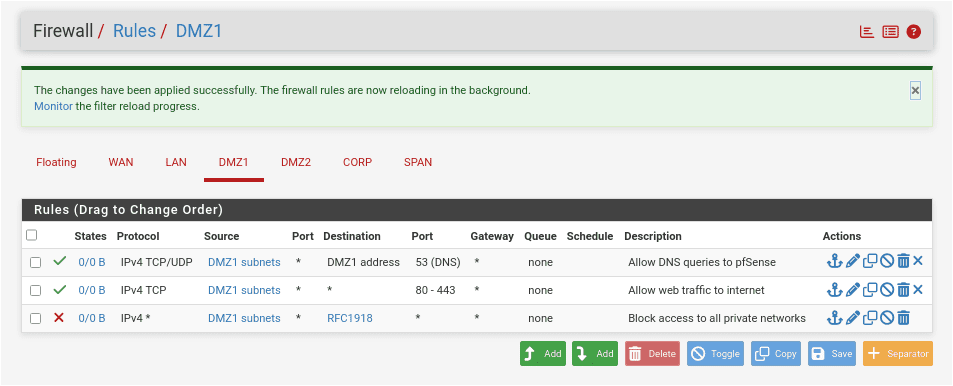
Click Apply Changes.
❗ Do not skip the Block RFC1918 rule. Without it, machines in DMZ1 have a clear path to your home network, your LAN, and every other segment in the lab. The DMZ exists to isolate vulnerable machines. This rule is what enforces that isolation.
Step 3: DMZ2 Rules
Click the DMZ2 tab and add the same three rules in the same sequence.
- Click Add ↓ (add to bottom):
- Action: Block
- Protocol: any
- Source: DMZ2 subnets (all traffic from the entire 10.30.30.0/24 subnet)
- Destination: RFC1918 (the alias you just created)
- Description:
Block access to all private networks - Click Save. Do not click Apply Changes yet.
- Click Add ↑ (add to top):
- Action: Pass
- Protocol: TCP
- Source: DMZ2 subnets
- Destination: any
- Destination Port: HTTP (80), HTTPS (443)
- Description:
Allow web traffic to internet - Click Save. Do not click Apply Changes yet.
- Click Add ↑ (add to top):
- Action: Pass
- Protocol: TCP/UDP
- Source: DMZ2 subnets
- Destination: DMZ2 address: this is pfSense’s own IP on this interface (10.30.30.1) not the whole subnet
- Destination Port: DNS (53)
- Description:
Allow DNS queries to pfSense - Click Save.
- Before clicking Apply Changes, verify your DMZ2 rule list looks exactly like this, from top to bottom:
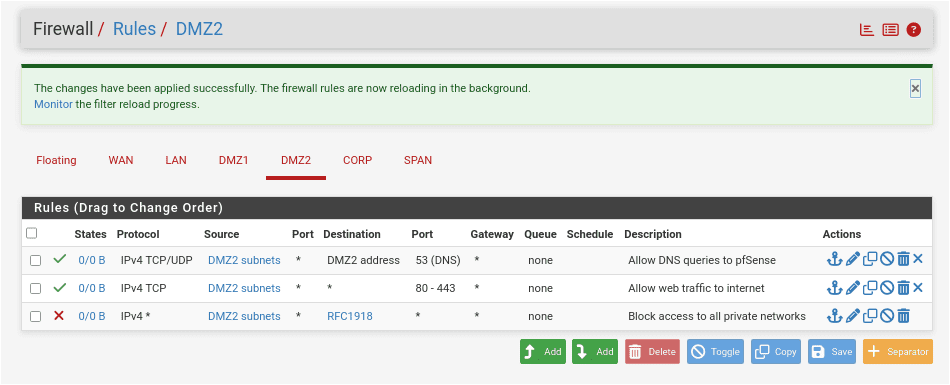
Click Apply Changes.
Step 4: CORP Rules
The CORP segment hosts your Active Directory environment. It needs more permissive outbound access than the DMZ segments to allow the Domain Controller to reach the internet for updates and Windows activation.
Click the CORP tab and add one rule. With only one rule, either Add button lands in the same place – you could flip a coin, but just use Add ↓.
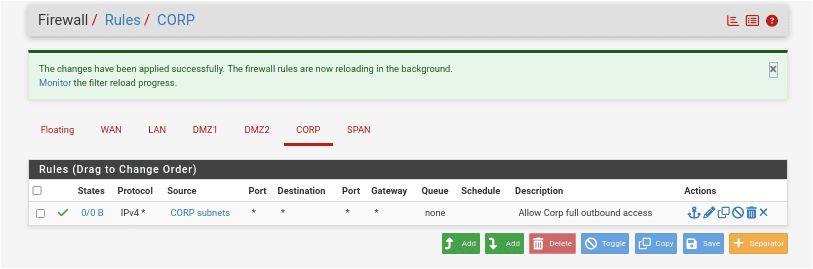
- Click Add ↓ (add to bottom):
- Action: Pass
- Protocol: any
- Source: CORP net (all traffic from the entire 10.40.40.0/24 subnet)
- Destination: any
- Description:
Allow CORP full outbound access
Click Apply Changes.
💡 CORP rules will get more refined as the lab builds out. Once Active Directory is configured and you understand the traffic patterns, you can tighten these rules considerably. For now, permissive outbound keeps things working while you’re getting the environment stood up.
Step 5: Verify LAN Rules
The LAN interface already has the rules it needs because pfSense creates them automatically when it’s installed. You don’t need to add anything here but confirm they’re present and haven’t been accidentally modified or deleted.
Go to the LAN tab and confirm you see the following three rules:
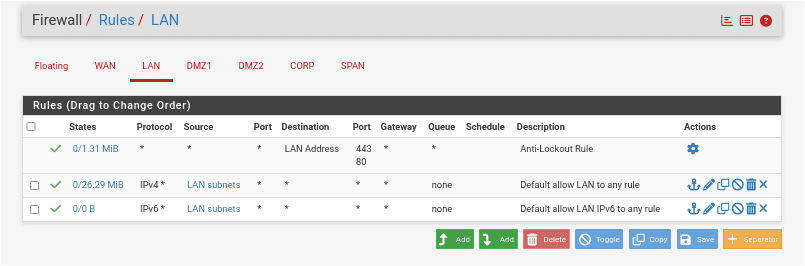
- Anti-Lockout Rule: automatically created by pfSense to ensure you can always reach the web interface from the LAN, even if you accidentally create a block rule. It has a gear icon instead of edit/delete buttons so that it cannot be manually edited or removed through the UI.
- Default allow LAN to any rule: allows all IPv4 traffic from LAN subnets to any destination. This is what lets Kali reach pfSense, all other segments, and the internet.
- Default allow LAN IPv6 to any rule: same as above for IPv6 traffic.
❗ If the default LAN rules are missing, Kali won’t be able to reach pfSense or anything else on the network. Re-add the IPv4 rule before doing anything else:
Action = Pass | Interface = LAN | Protocol = any | Source = LAN net | Destination = any | Description = Default allow LAN to any rule
💡 Don’t add block rules above the default allow rules on LAN unless you specifically want to restrict Kali’s access to something. If Kali suddenly can’t reach pfSense or the internet, the first thing to check is whether a block rule ended up above the default allow rule on this tab.
Step 6: Verify WAN Rules
Click the WAN tab. You should see one rule:
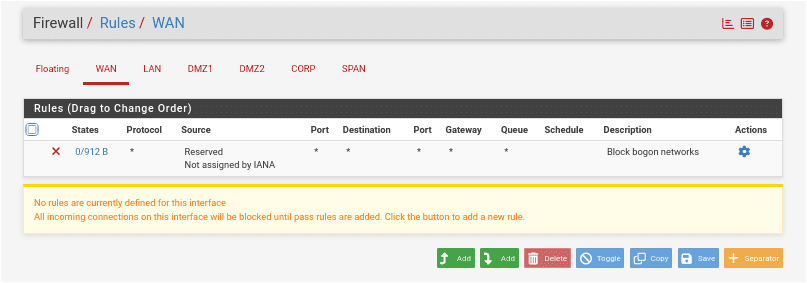
- Block bogon networks: blocks traffic from invalid and unassigned IP ranges arriving on the WAN interface. This was configured in Part 1 and should already be in place.
No additional WAN rules are needed. All inbound traffic is blocked by default and the Block bogon rule handles invalid ranges on top of that.
Step 7: Confirm SPAN and Floating
Click the SPAN tab – it should be empty. No rules needed. SPAN is a passive monitoring interface that receives copies of traffic from other segments. It doesn’t route traffic and doesn’t need firewall rules.
Click the Floating tab – it should also be empty. Floating rules apply across multiple interfaces simultaneously and are an advanced feature. Nothing is needed here for this lab stage.
💡 Once your rules are confirmed, it’s a good time to take a configuration backup before moving on, Part 7 covers this.
Part 6: Enabling Logging
Before you call this done, let’s turn on firewall logging so you can see what your rules are actually doing.
Go to Status > System Logs.
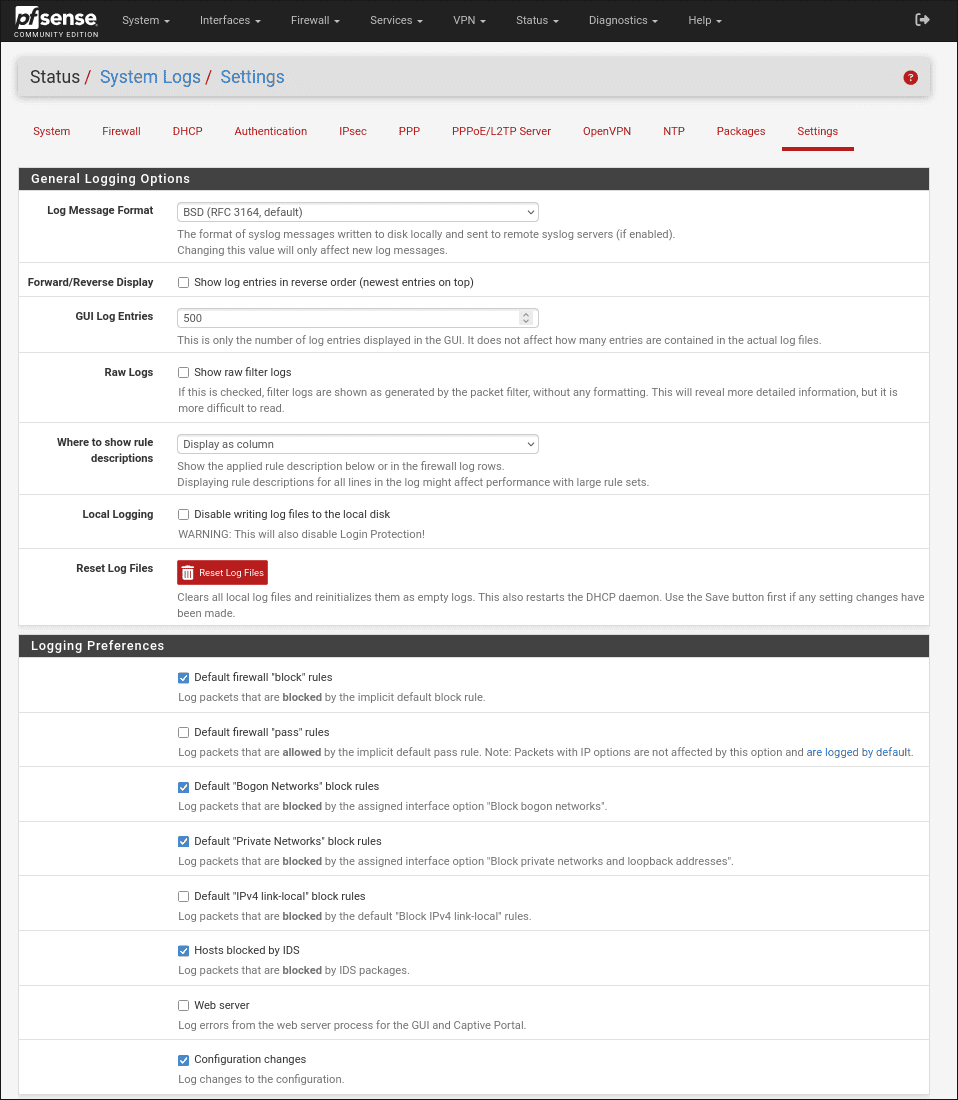
- Click the Settings tab and confirm the following settings:
General Logging Options:
- GUI Log Entries to Display:
500
Logging Preferences:
- Default firewall “block” rules: Enable
- Default “Bogon Networks” block rules: Enable
- Default “Private Networks” block rules: Enable
- Hosts blocked by IDS: Enable
- Configuration changes: Enable
Click Save.
- GUI Log Entries to Display:
- Now click the Firewall tab to view live firewall traffic.
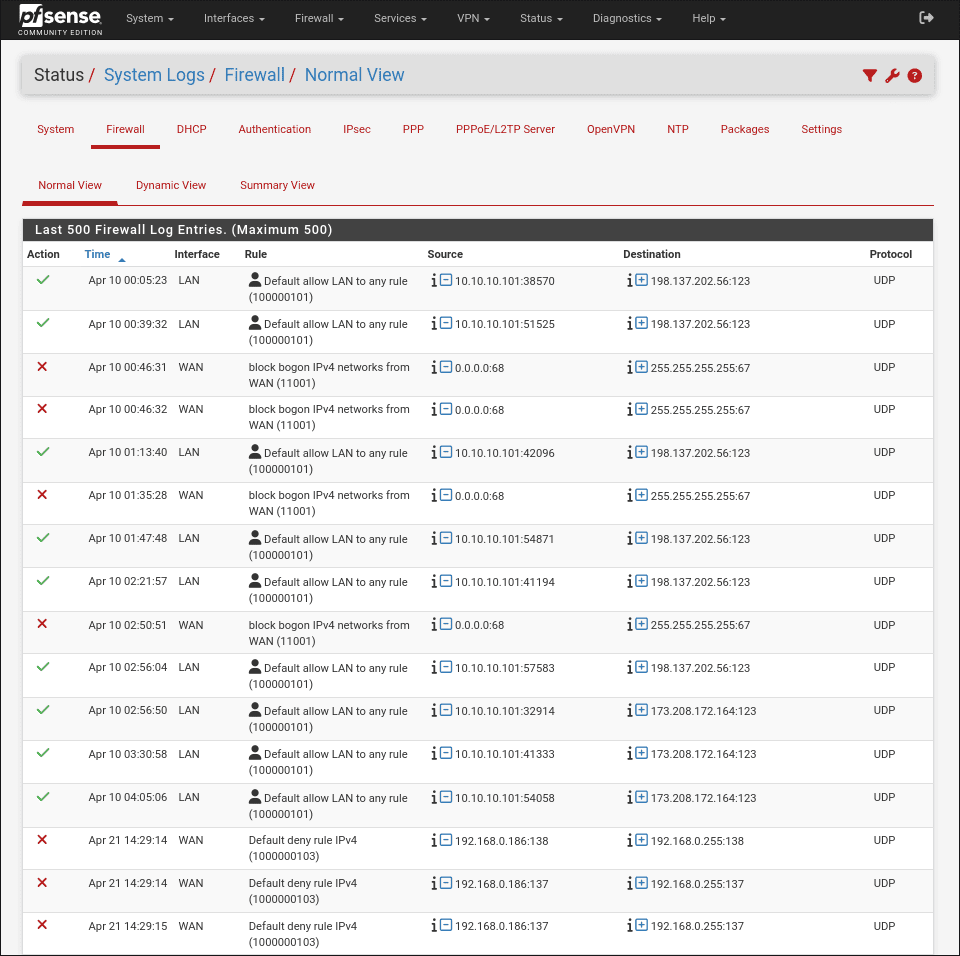
Generate some traffic from Kali: open a browser, ping something, run sudo apt update and watch it show up in the logs. This is one of the more immediately satisfying moments in the lab setup process: you can see exactly what’s flowing through your firewall in real time.
💡 Logs are how you learn what your rules are actually doing. When something isn’t working as expected, the firewall log is the first place to look. A blocked connection shows up as a red entry with the source, destination, and the rule that matched. An allowed connection shows in green. Once you’re looking at real traffic, it clicks fast.
Part 7: Backing Up Your Configuration
Do this now. Seriously. You’ve just spent the better part of an hour configuring interfaces, DHCP, firewall rules, and aliases. None of it exists anywhere except inside that VM. Back it up before you do anything else.
Go to Diagnostics > Backup & Restore.
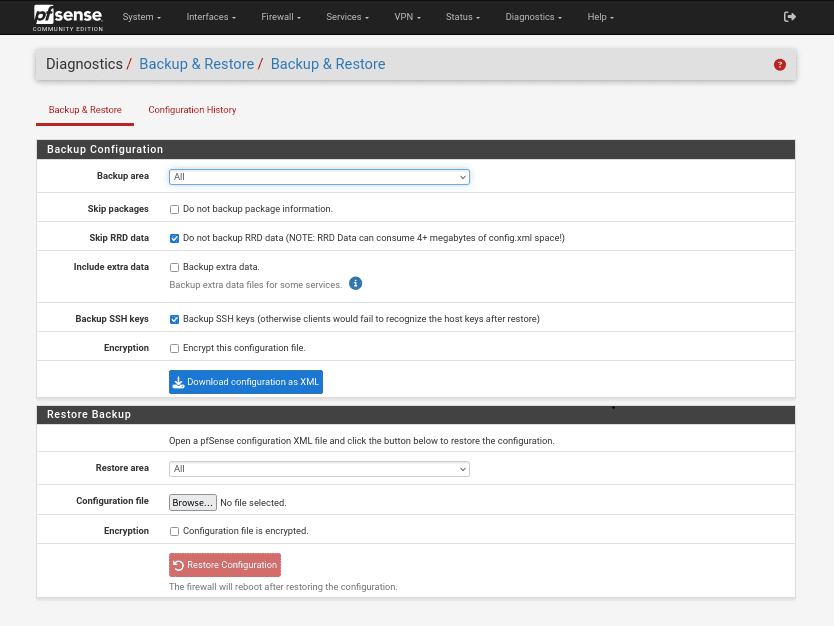
- Click Download configuration as XML.
- Save the file somewhere outside the VM –
D:\Penumbra\Backups\is a good place for it.

💡 Back up after every major change. New interface? Backup. New firewall rules? Backup. Added an alias? Backup. The backup file is small, the restore process is painless, and the alternative is recreating everything from scratch. Version your backups with dates in the filename, something like pfSense-config-2026-04-07.xml, so you can roll back to a specific point if needed.
Testing Your Configuration
Before adding any VMs to the DMZ or CORP segments, verify the rules are working as expected from Kali.
From Kali’s terminal, all of these should succeed:
ping -c 4 10.10.10.1    # pfSense LAN interface
ping -c 4 10.20.20.1    # pfSense DMZ1 interface
ping -c 4 10.30.30.1    # pfSense DMZ2 interface
ping -c 4 10.40.40.1    # pfSense CORP interface
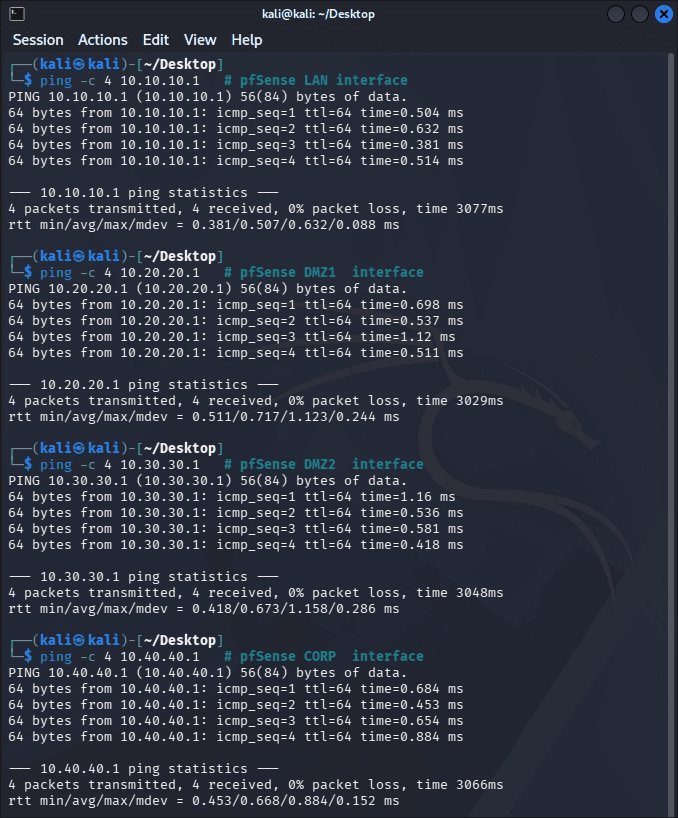
Kali is on the management LAN and should be able to reach every pfSense interface directly. If any of these fail, check that the interface is enabled and that no LAN block rules are interfering.
💡 Once you add a VM to DMZ1, run these from that VM — the first two should succeed, the last three should fail. If the last three succeed, your isolation rules aren’t working and need to be reviewed before you add anything else to the lab.
# Should SUCCEED
ping -c 4 8.8.8.8            # Internet access
curl -I https://google.com   # HTTPS to internet

# Should FAIL - if these succeed, your isolation rules aren't working
ping -c 4 10.10.10.1         # LAN (management network)
ping -c 4 10.40.40.1         # CORP segment
ping -c 4 192.168.1.1        # Home network
Troubleshooting
VMs not getting a DHCP address on DMZ or CORP?
- Confirm DHCP is enabled on that interface in Services > DHCP Server
- Confirm the VM is connected to the correct VMnet in VMware settings
- Check current leases at Status > DHCP Leases
- From the VM terminal, try
sudo dhclient -r && sudo dhclientto force a new request
Internet not working from DMZ?
- Test by IP first:
ping 8.8.8.8(if this works but DNS doesn’t, it’s a DNS rule issue, not a routing issue) - Check rule order: Allow rules must sit above Block RFC1918
- Go to Firewall > NAT > Outbound and confirm it’s set to Automatic Outbound NAT
DMZ machine can reach networks it shouldn’t?
- Check rule order: Block RFC1918 needs to be below your Allow rules but above the implicit deny
- Verify your RFC1918 alias contains all three ranges
- Check the firewall logs to see which rule is actually matching the traffic
pfSense web interface unreachable after applying changes?
- Wait 30 seconds and try again – pfSense sometimes needs a moment after applying rule changes
- If still unreachable, go to the pfSense console on the VM and select option 11 (Restart GUI)
Tutorial Debrief
📖 Log Entry:
- 🗸 Changed the default admin password
- 🗸 Configured hostname, DNS servers, and timezone
- 🗸 Configured all four optional interfaces (DMZ1, DMZ2, CORP, SPAN)
- 🗸 Enabled DHCP on each active segment
- 🗸 Created firewall rules with proper isolation for DMZ1 and DMZ2
- 🗸 Set up the RFC1918 alias for reusable rule management
- 🗸 Enabled firewall logging
- 🗸 Backed up your configuration
⚙️ Skills Stack:
- pfSense web interface navigation
- Network interface configuration and naming
- DHCP server setup per segment
- Firewall rule logic and rule ordering
- Alias creation for rule management
- Log analysis
- Configuration backup and documentation
Next Objective
The firewall is configured, every segment is live, and the rules are in place. Time to put something in the DMZ and see if the isolation actually holds. Tutorial 5 covers adding Metasploitable2 (your first intentionally vulnerable target) to the DMZ1 segment, and running your first basic scans from Kali to confirm everything is working the way it should.
Resources
- pfSense Documentation: https://docs.netgate.com/pfsense/
- Netgate Forums: Active pfSense forum community
- r/pfSense: Reddit community
Questions, errors, weird behavior – comment below and we’ll debug it together.